
The Re-Textured Tablescape
Sep 15, 2021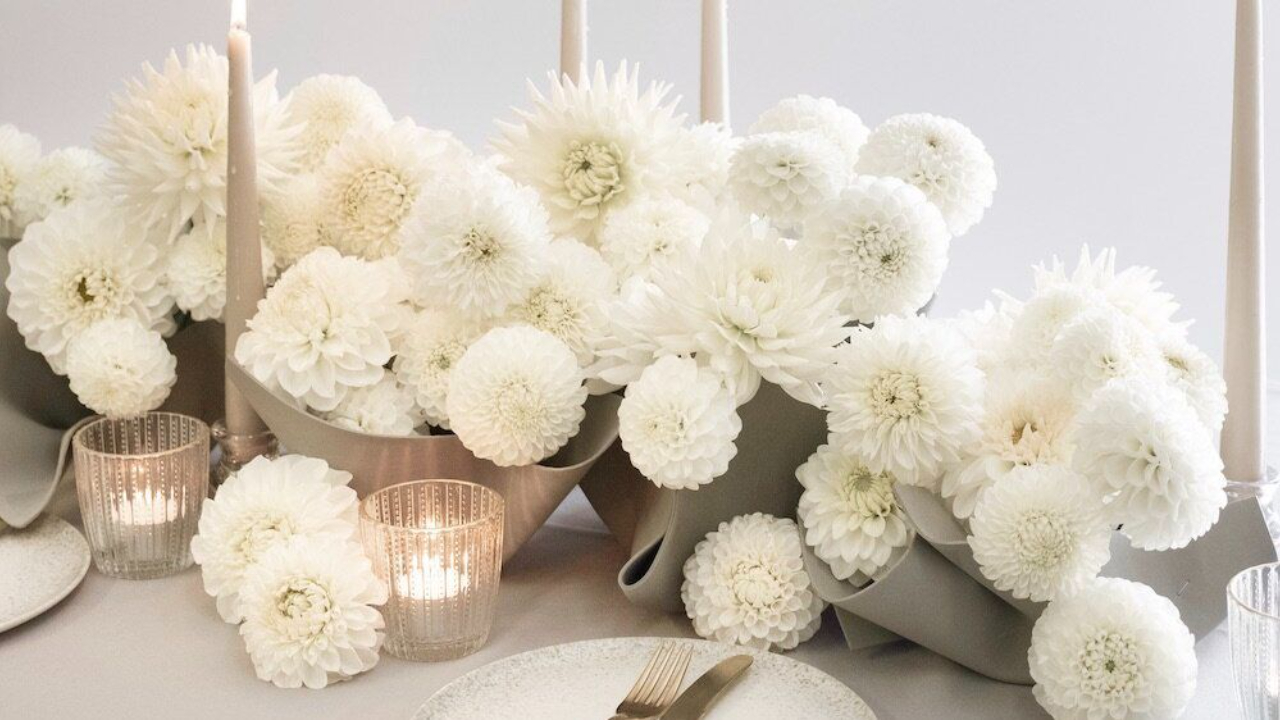
THE DAHLIA HOW TO YOU’VE ALL BE WAITING FOR
Ahead of our next collection of online courses launching next week, we have a very special post to share with you today - our first free Step by Step, featuring every detail on how to create a refined tablescape that is both contemporary and stylish, yet also incredibly economic to produce, and easy to re-create too.
We promise you’ll be delighted by just how easy this technique is to replicate - dive on in to all the goodness below.

We don’t know about you, but our prop budget (or indeed, the necessity for new props) has been more than a little lacking this year! As such, we’ve been busy in our Studio putting our creativity to the test and finding new ways to repurpose existing vases and props - finding ways to give them a new lease of life. Retexturing is a great way to achieve this - and essentially involves taking an existing vessel and with the addition of new materials, providing it with a fresh new look, in a practical and cost effective manner.
It goes without saying that we're a big fan of retexturing - in our first collection of online courses we included The Textured Vase, and in our brand new collection (launching 21st September) we’re including the Meadow Tablescape - both of which showcase innovative ways to give a tired or boring vessel a brand new aesthetic which can be used time and time again.
In today’s step by step, first published for the inspirational Botanical Brouhaha, we wanted to share a handy little retexturing technique that costs so little to do, but packs a big punch and can be re-used time and time again.
Let’s dive in!

1 - For this retexturing project we’ll be using art foam, an arts and crafts material commonly found in crafting stores. We’ve selected art foam for this project as its waterproof and holds its shape nicely once manipulated - do note however that the same technique can be applied to any decorative papers - they just obviously may not be quite as waterproof! Art foam is commonly found in craft stores at a really economic price, and available in a wide variety of colours, so for this project we encourage you to select a hue that compliments the celebration you have in mind! To begin, take your vase, and place it in the centre of a sheet of art foam. With the vase in the centre of the art foam, fold up one quarter of the sheet until it’s flat to the side of your vase, and hold this side in place using your thumb, whilst you repeat the process and fold up a second corner of the sheet also.

2 - With two quarters of the art foam pressed against your vase, you’ll find a small edge has formed - just what we want! Next pinch into this edge with your hand, relatively low down the vase (maybe an inch or so from the bottom of the vase), and using your stapler, puncture the art foam tightly against the glass. We find that one good staple will do the trick, however you can use more than one if you feel it is required.

3 - Turn your vase roughly 90 degrees, and repeat the process by folding up the third side of the sheet. Again, this will create another fold, which again, puncture with a staple to keep the sheet in shape. You’ll now have two corners starting to cup against your vase.

4 - Repeat the process again - folding up the third side of the art foam, and creating a third fold which also requires a staple to hold the side of the sheet in place. Finally, bring together the two loose sheets of the art foam, and hold together next to the vase to create the fourth and final fold. Add a staple to finish this fold, and to secure it firmly in place. In-front of you, you’ll now have a four sided sculptural form, reminiscent of a handkerchief style vase, with your glass vase tucked tightly in the centre.

5 - Repeat this process over and again until you have the required number of vessels for the styling you wish to create. For a standard trestle table (here in the UK, that is 6ft x 2.5ft) we’d suggest you’ll need 10 -12 vases to fill the space, but of course this will vary depending on how full you wish the tablescape to be. When we create this tablescape, we do try to create a these origami forms across at least two different levels by using taller and shorter vases tucked inside the folded sheets. We find that this enables us to create a design that has different levels of interest for the observer, allowing some taller blooms to provide impact, and some lower vessels to fill with blooms closer to the table. Here we’ve repeated the technique on a shorter glass votive holder, so there is a mix of taller cylinder vases, and shorter votive glass vases for this tablescape.

6 - Once you’ve created a number of vases, you can fill them with water (approximately half full). When it comes to mechanics to hold our flowers we have two options which we recommend. The first is ideal if you’re planning on using lighter blooms, or a smaller amount of blooms in your tablescape. Start by taking a small piece of art foam, roughly three inches by two inches. Fold the small sheet in half, and scrunch it up in your hand just a little, before popping it into the centre of your retextured vases. This additional, mini sheet of foam will enable you to slide your stems in and around it’s folds, securing them in place within the vase, and for additional hold, you could even pierce this small piece of foam with your knife, prior to placing your stems, allowing you to secure a bloom through the sheet, holding it exactly where you’d like it to be.

7 - Alternatively if you plan on using heavier blooms, or just more blooms in general per vase, you can always tuck a pin holder into the base of some of the vases, securing with cling (sometimes called oasis fix) as required. Once your mechanics are in place, style the retextured vases down the centre of your table, proportioning them as you see fit, with a mixture of heights as desired.

8 - Over the past few year or two, we've been experimenting with a method of arranging we're calling ‘blocking’, and it’s via blocking that we’ll be arranging our Dahlia blooms into our retextured vases today. Taking inspiration from colour blocking, floral ‘blocking’ involves using one type of flower to create contemporary, sculptural forms, with a focus on form and line, and less on texture and colour. Primary, Secondary and Tertiary blooms are still utilised, however our in our mono-floral composition, we designate our larger blooms as Primary blooms, and the ever smaller blooms as Secondary and Tertiary accordingly. Using a sharp knife, remove all foliage from your Dahlia stems, and cut each stem on a 45 degree angle, then begin to add the primary, largest blooms first, and place these Dahlia low into the vases, ideally towards the centre of your tablescape. More unusually shaped dahlia should be placed at key points through the design - perhaps in a 3-5-8 fashion, or in a well proportioned manner that suits the tablescape.

9 - Continue to add further (secondary) Dahlia into your tablescape, filling out each retextured vase. Proportion smaller blooms towards the outside of your composition, and larger blooms towards the inside or centre of your design. Begin to ‘block’ these blooms atop of, above and next to, your initial primary blooms, almost massing the Dahlia together, but not in a neat, tight form. Look for interesting angles, and consider creating moments of contrast through their varying forms. Continue to remove all foliage from each stem as you go, ensuring that each stem finds its way successfully into a water source.

10 - Now we’ve placed our primary and secondary blooms it’s now time to place our tertiary sized Dahlia throughout the piece. These smaller Dahlia blooms should be placed both towards the outer edge, and also placed higher in your composition. Add these smaller Dahlia through your piece to create a layer of lightness above the heavier blooms below.

11 - Now we’ve arranged all our blooms, and all our vases are filled, we can now style the tabletop accordingly. In this tablescape we’ve added in a curation of grey taper candles and cut glass votives, complimented with the addition of the odd Dahlia head styled onto the table top. Whilst these Dahlia heads will not last long, here in the UK we find our weather temperate enough that they’ll easily last the duration of an event - plus it’s a great way to make use of Dahlias that might’ve damaged during processing. Finish the tabletop with tableware, styled to taste.


Enjoy!
Team Joseph Massie
Artist. Educator. Writer. Broadcaster.


