
Two Essential Sustainable Floral Design Techniques to Master Today
Jun 26, 2025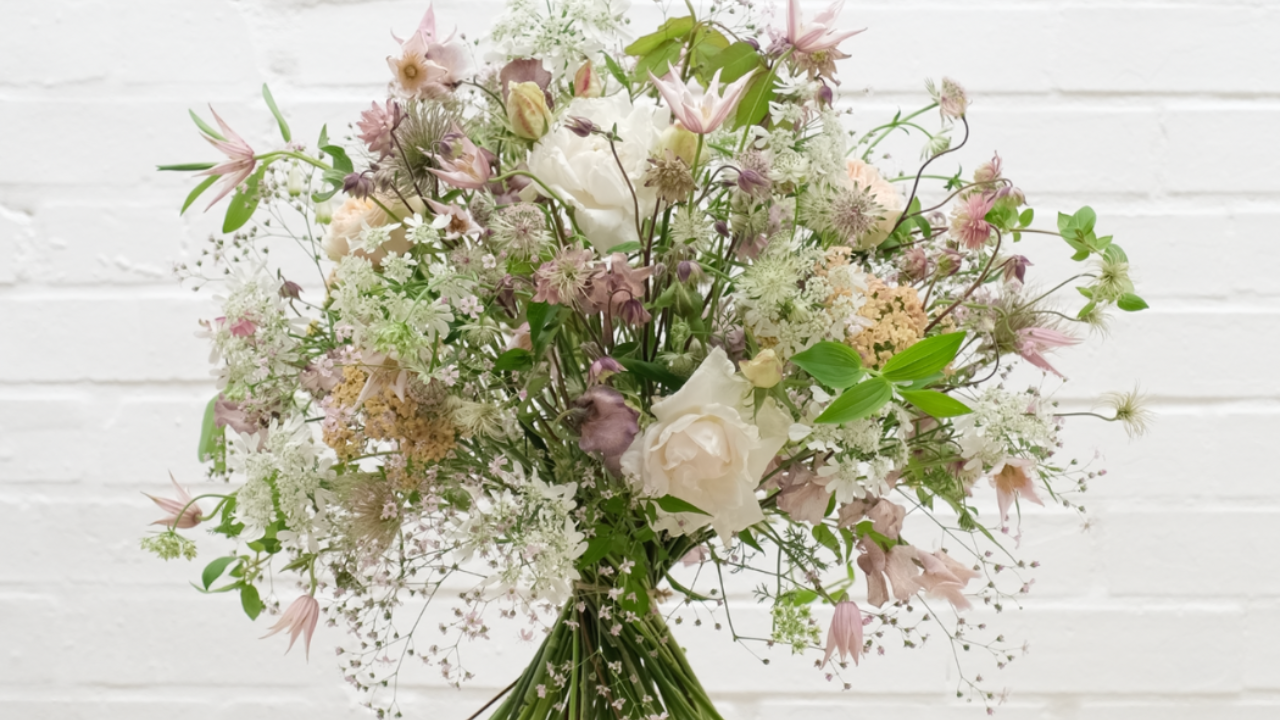
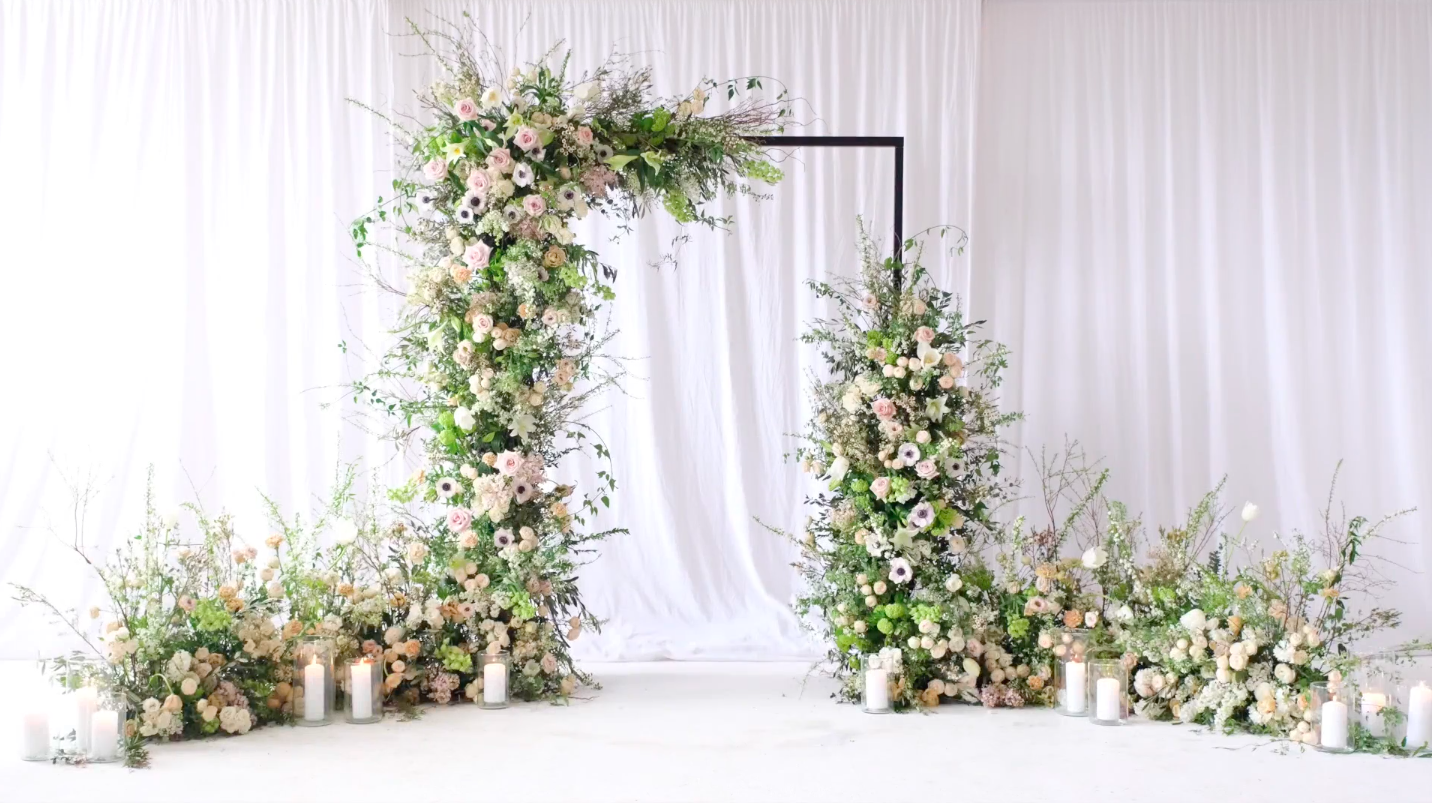
Image : A Bouquet Scramble taken from Flower Class
Sustainable Floral Design... It’s a phrase we hear more and more, but what does it really mean in practice? And why does it matter?
Well, for me, the answer begins with this simple idea: knowledge is power. Truly, the more you know, the more informed you are - and, hopefully, the wiser you are too. The more techniques you have at your fingertips, the better decisions you can make - and the more resilient your business becomes.
When we explore sustainability in floral design, we open a whole other cupboard, a whole world of techniques that are often simpler, cheaper, and frankly more enjoyable to use. They give you the chance to create beautiful, abundant floral work while being kinder to the planet, better for your local environment, and often more appealing to your clients.
Because let’s be clear: sustainability sells. In a busy world filled with noise, distractions, and infinite choice, being able to say that you use sustainable techniques can genuinely help you stand out. It helps carve out your USP, your unique selling point, in a way that’s deeply relevant right now. It builds trust with your audience. It adds value to your brand. It’s not just the right thing to do, it’s also a smart business move.
And beyond the business case, there’s a personal one too. When we learn new techniques, when we put ourselves in a space where we are actively learning, we unlock new creativity. It fuels growth. It sparks ideas. It refreshes your thinking. And very often, the result is that you save time, save energy, save money - all while becoming a stronger, more confident designer.
That’s exactly what Flower Class is designed to do, give you the techniques, knowledge and mindset to create sustainable, professional floral work that’s as good for your business as it is for the planet.
In today’s post, I’m sharing two of my all-time favourite sustainable techniques, both taken directly from inside Flower Class. They’re low-waste, low-cost, and incredibly effective. These are techniques I’ve used time and time again in weddings, events, and editorial work, and I know they’ll serve you well too.
Let’s dive in.
The Scramble
A light, open, reusable bouquet structure.
This technique is something pretty special. It’s called The Scramble, and I genuinely think it’s one of the most commercial, simplest, and most sustainable frameworks I’ve ever had the pleasure of teaching. If you love creating bridal or hand-tied bouquets that are open, airy, effortless and light then this is the technique for you.
If you’ve ever worked with chicken wire, or used foraged branches as a base structure in your bouquet work, then The Scramble will feel instantly familiar - but easier. It creates that same structural support, without the fiddly wrestling of mesh or sharp edges. It’s reusable, repeatable, and just a joy to make.
All you need is:
-
Ten individual wires (I like a 1.2 gauge, but anything between 1.0 and 1.5 is perfect)
-
A roll of Stemtex or Parafilm - either is fine, pick your preference (but just to note, Stemtex is a paper-based tape and is generally considered more sustainable than Parafilm, which is a wax-based film.)
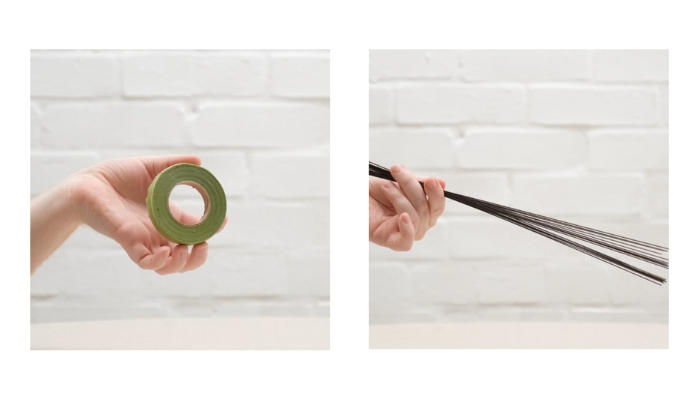
Step one is simple: take the base of your ten wires - about 10 to 12 centimetres from the bottom - and bind them firmly. This becomes the handle of your rather delectable Scramble.
Next, splay the wires out one by one at a 90-degree angle, like the spokes of a bicycle wheel or the ribs of an umbrella. You’ll quickly start to see the base of your structure form - a neat, clean, open shape that gives your bouquet its framework.
Step two is all about shaping. Visually divide each wire into thirds:
-
At the first third, bend the wire up
-
At the second third, bend it down
-
At the final third, bend it left or right
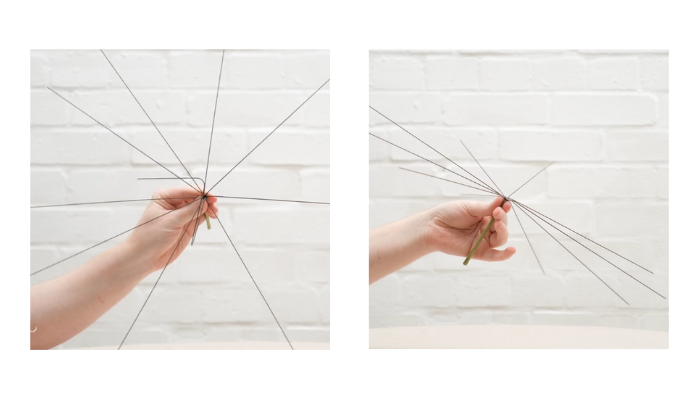
What this does is build space into the structure - and space, in this technique, is everything. You’re creating those pockets of air and light that let your flowers really shine. This technique isn’t about hiding your blooms in a dense ball - it’s about showcasing them in a structure that breathes.
You’re sculpting something light, elegant and breathable which supports a much more naturalistic floral design. The flowers sit between the structure, not buried inside it. And the result? A bouquet that feels loose, romantic, and confident.
But what makes The Scramble truly brilliant is its sustainability. The whole thing is completely reusable. You can make one structure and use it again and again, week after week, wedding after wedding. It’s foam-free, fuss-free, and frankly, a joy to teach. It’s also incredibly lightweight, easy to transport, and cost-effective.
Whether you’re building your design around one big bloom moment or a more delicate mix of seasonal materials, The Scramble gives you the base you need to do it, beautifully.

Develop this further in Flower Class
We explore The Scramble in detail inside Flower Class, including how to adapt it for different stem weights, colour palettes, and more intricate forms. You’ll find a full visual demonstration and lesson that you can watch (and rewatch) at any time.
Willow & Water
A structural, sustainable mechanic for installations and large-scale design.
Next up is a technique that I return to time and time again in my own wedding and event work. It’s called Willow & Water, and it’s the definition of simple, sustainable design.
The premise is easy: We’re building structure using willow bundles or any flexible, local branch that you have to hand and combining that with reusable water sources like spikes, picts or test tubes. The result is a lightweight, low-waste structure that you can use in archways, installations, backdrops, fireplace mantels, or even free-standing sculptures.
Let’s walk through the technique.
Step one is gathering your willow. I like to use Salix, gathered in spring when it’s at its freshest, but it’s available year-round. I f willow doesn’t grow where you are, don’t worry, just use what’s local and flexible. Dogwood, birch, hazel - they all work.
Take around 10 stems and loosely bundle them together using paper-covered wire. I use three lengths of wire spaced equally along the bundle - top, middle and base - and I make sure the binding is loose. This is important.

We’re going to insert materials into the structure, so if the willow is bound too tightly, there’s nowhere for anything to go. The bundles should feel a little springy. There should be movement. This is the one time I’ll allow a little sloppiness in the binding - you want those gaps, that flexibility.
Step two is about attachment. Bind your bundles onto your chosen framework - I often use a collapsible art arch from Floresie Frameworks - working from the bottom up. Let gravity help you. You can cluster bundles toward the back, layer them up depending on your desired thickness, and adjust the placement depending on the form you’re after.
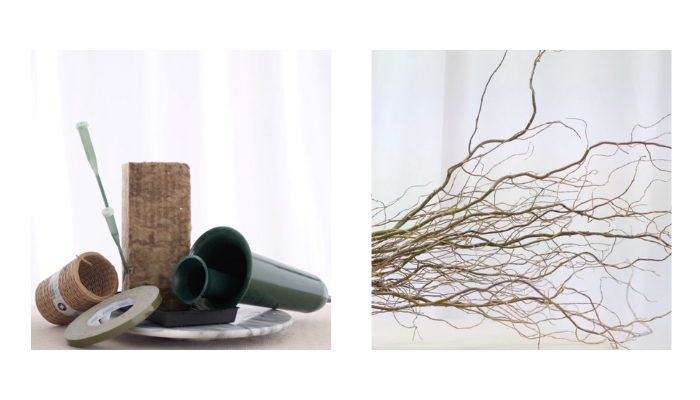
From there, it’s time to add your water source. For this, I use:
-
Water spikes (also known as grave spikes) in varying sizes, tucked into the willow itself
-
Water tubes or picks - those little test tubes on sticks - for delicate or tricky stems
- I also used Agrawool in this design, to pool the flowers out around the base of the arch.
Push the spikes about a third to halfway into the willow so they feel secure. And then, start adding your materials. The willow structure acts like a cloud - gently catching and holding your stems without force, letting the shape emerge naturally.

This technique gives a wonderfully organic feel to your installations. It’s light, it’s breathable, and it doesn’t rely on traditional floral foam or heavy mechanics. You can adapt it for almost anything - archways, chuppah, ceremony backdrops, doorways, fireplace mantels. I’ve even used it to create floating floral pieces.
It’s incredibly cost-effective too. Willow is one of the cheapest materials you can buy in spring (and free if you grow or forage your own), and the water vessels are reusable time and time again. Once the willow starts to break down, you can simply compost it.
Develop this further in Flower Class
Inside Flower Class, we explore multiple variations of Willow & Water - including more advanced applications for large-scale work and fine-tuned techniques for layering. You’ll also find guidance on choosing the best water vessels for your design needs and client budgets.
Why these techniques matter
So, why do these techniques matter?
Because they give you freedom. The freedom to create work that’s lighter, looser, more beautiful - without relying on floral foam. The freedom to reduce waste, reduce costs, and increase your design flexibility. The freedom to talk confidently to your clients about how your work reflects your values.
These techniques are the building blocks of a more sustainable floristry practice. And that practice? It’s not just better for the environment - it’s better for you, your creativity, and your business.
In a world where clients are asking more questions, where budgets are tighter, and where our industry is waking up to its environmental impact, having these tools in your back pocket can make all the difference.
I hope you love The Scramble and Willow & Water as much as I do. And if you want to explore them more deeply - and learn dozens of other sustainable techniques - come and join me inside Flower Class.
Because when it comes to floristry, sustainability doesn’t have to be a compromise.
It can be your greatest creative advantage.
Artist. Educator. Writer. Broadcaster.


